After installing SyncBack V12 you may find that V11 is still installed as well, with two separate Start Menu shortcuts. This happens when the two versions were installed in different ways: one for the current user and one for all users. They are separate installations, so V12 was added alongside V11 instead of replacing it. This article explains why it happens and how to end up with a single, correct installation.
What you are seeing
You have two copies of SyncBack on the same PC. You cannot confirm this in Settings > Apps > Installed apps, because it will only show V11 as being installed. However, if you go to Control Panel > Programs -> Programs and Features, both appear. For example:
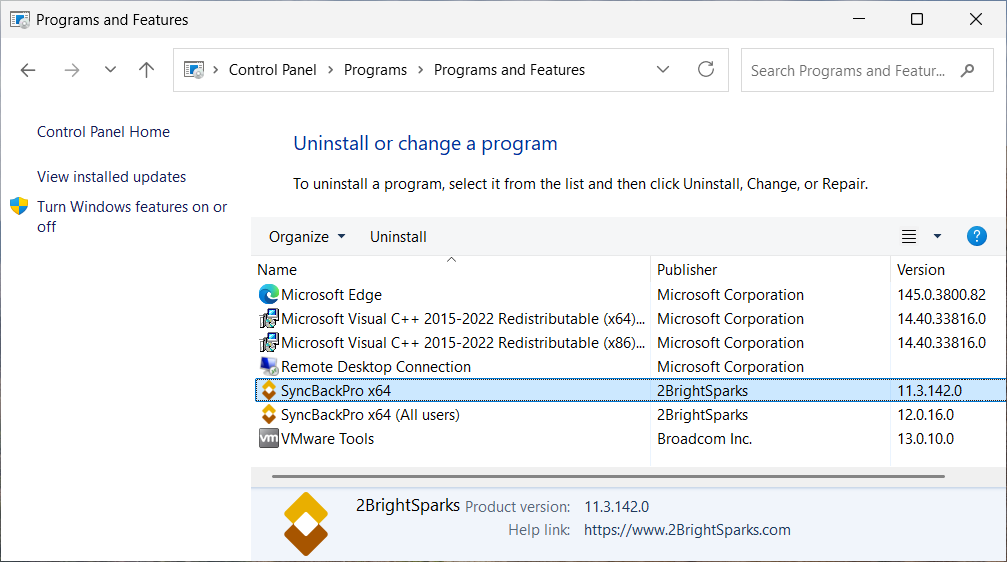
SyncBackPro x64 <--- this is V11
SyncBackPro x64 (All users) <--- this is V12
The Start Menu also shows two SyncBack shortcuts: SyncBackPro and SyncBackPro (Not Elevated):
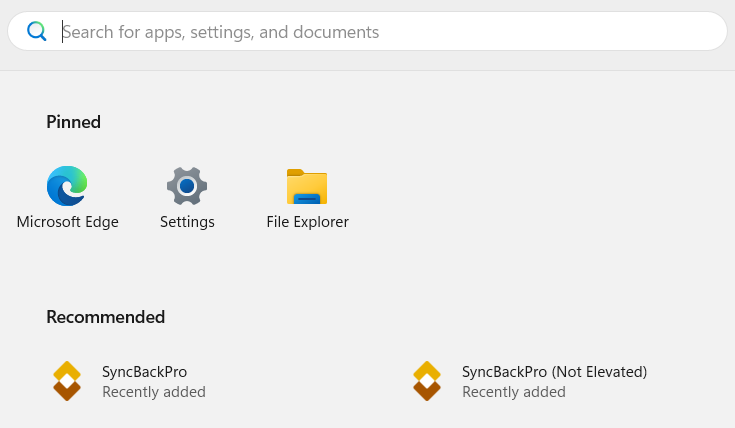
The SyncBackPro shortcut will open V12 elevated, whereas the other SyncBackPro (Not Elevated) will open V11 non-elevated.
Why this happens
SyncBack can be installed in two separate ways:
- For the current user only. This does not need administrator rights.
- For all users. This needs administrator rights (elevation).
These are independent installations. They are stored in different locations and one does not replace the other.
In this case, V11 was installed for the current user (using SyncBackProV1164_Setup_NE, for example). When V12 was installed, the elevated installer was used (SyncBackPro64_Setup), which installs for All Users. The installer detected the existing current-user copy and displayed this warning:
Already Installed
It looks like you have already installed SyncBackPro for the Current User.
Are you sure you want to continue the installation for All Users?
Choosing Yes installs V12 alongside V11 instead of over it. The result is two versions installed at the same time, each with its own Start Menu shortcuts. The current-user shortcut runs V11 and the all-users shortcut runs V12.
How to fix it
1. Close SyncBack if it is running. Check the notification area (system tray) near the clock and close it there too.
2. Open Settings > Apps > Installed apps, or Control Panel > Programs -> Programs and Features.
3. Uninstall the V11 entry. This is the one without "(All users)" after the name, for example "SyncBackPro x64".
4. During the uninstall you will be asked whether you want to keep your settings and profiles. Choose to keep them so that nothing is lost.
5. Leave the "SyncBackPro x64 (All users)" V12 entry in place.
You will then have a single installation: V12 for all users.
Will I lose my profiles or settings?
No, as long as you choose to keep them when the uninstaller asks. The uninstaller prompts you before removing anything, so select the option to keep your settings and profiles. Your profiles will remain available in V12.
Avoiding this in future
Use the same installation type each time. If you first installed for the current user, either keep using the current-user installer, or fully uninstall the current-user version before switching to the all-users installer.
Note
This article uses SyncBackPro as the example. The same steps apply to SyncBackSE and SyncBackFree. Substitute the matching product name where it appears.